Craftsuprint - The Worlds Largest Legal Craft Download Site!
Showing posts with label Technique Tuesday. Show all posts

Tuesday, 16 April 2013

Technique Tuesday - Tagging Along!

Hi Everyone
Sue Here


This week myself and Natalie are showing you mini tag books.  Today's  project covers a few techniques.

 The tags are on the J & C Creations website and I have added backing papers, words cut from newspapers and word stamps.  The flowers are a VERY old sizzix die inked with versamark and yellow and orange WOW embossing powders and heat set.  The suitcase is chipboard and one I dug out from my stash.

I have used a mixture of chipboard and acrylic tags in this project to add dimension.


Inside is a piece of tissue paper stamped with a flower stamps in versamark and sprinkled with yellow and orange WOW embossing powder and heat set.  This technique you could use with any present to jazz up plain tissue paper!


 The outside was decorated with some stickers I have had for years.  The background is the crackle technique with acrylic paint and PVA glue.  here are the instructions:
1. Paint the surface with an acrylic paint colour you wish.  This colour will pop through the top layer when finished.
2.  Heat set this.
3. Paint a thick layer of CHEAP and I mean CHEAP PVA glue on the top of the paint, then dry off until it is tacky but NOT dry.
4. Put another thickish coat of acrylic paint over the top of the PVA glue. It is good if you use a different colour., then put the heat gun towards the paint and watch the PVA glue crack the paint over the top.  This is due to the glue shrinking and cracking quicker that the paint.  Good Ey!!

Hope you like these techniques, try them as backgrounds for your cards....take care....Sue

Tuesday, 12 March 2013

Technique Tuesday - What comes through my door!

Hi Everyone
Sue Here


Today I am altering a tag and showing you that anything that pops through your door can be used to decorate it.

I have used on of the Ranger manila tags and firstly taken a magazine that came through the door and cut out some pictures, hearts and words.  I then stuck these onto the tag with cosmic shimmer glue.

I then took picket fence and evergreen bough distress stains and inked the tag around the pictures.

I then used versamark and inked up the 'Flower Fun' M Bossabilities folder and ran it through my big shot.  I then sprinkled WOW Pastel Yellow embossing powder over the top and used a small paintbrush to dust off any powder I did not want, preferably over the words.  I then heat set it.

I then went around the edge with seedless preserve distress ink and added ribbons to the hole at the top of the tag.


I then die cut some Tim Holtz tattered florals and tattered leaves from 2 used x brown envelopes from posted birthday cards and inked these up with distress inks and sprays. I stamped in versamark the Heartfelt Creations tattered collage stamps and heat set with WOW bright white embossing powder.  I used a vintage buttons for the middle of the flowers

All the highlighted items can be purchased from the website.
Cheap and cheerful.......Take care......Sue.  

Tuesday, 19 February 2013

A little vintage tag


Hi Everyone.

Vintage shouted out to me today.


Materials needed:
Tag.
Ribbon.
Die cut scroll.
Gem.
Backing paper with script on it.
Distress inks in chipped sapphire, black soot, vintage photo, milled lavender.
Adirondack – woodlands.
Martha Stuart punch.
Clear embossing ink.

Background stamps
Marianne silhouette die 
Border Punch
WOW Embossing powders:

Take your white tag and stamp dots on each side with clear embossing ink.  Sprinkle clear embossing powder and heat set.   Once cool put distress ink over the tag in blue, purple and go around the edges in black.  Rub off excess over the embossing with a piece of kitchen towel (resist technique).
Use a piece of plain card stock to make a mat/layer to the next tag which is smaller than the first.
Stamp a background stamp on white card stock with clear embossing ink, sprinkle with clear embossing powder and heat set.  Once cool put Adirondack woodlands ink over the embossing.  Rub off excess over the embossing.(resist technique). Cut this in a smaller tag shape.
Use your edging punch down both sides of a piece of white card.  Colour this in with the same distress inks you used for the original tag.
 Get a piece of ribbon which co-ordinates with your colour theme and place down the centre of the punched piece of card.
Stamp out or die cut a cameo frame and ink with clear embossing ink and emboss with Copper powder and cut out.  Colour the edges in the same colours you used for the background stamp.
Stamp or die cut the cameo of the ladies face in a script backing paper and cover in clear embossing ink   Take an oval die and cut out a piece which will fit the silhouette. Cover in lagoon embossing powder. Glue the silhouette onto the frame.
Use a gem for a jewel around the neck.  Die cut a scroll and put the tag together.
Use ribbon through the hole at the top of the tag.

Take care...Sue


Tuesday, 5 February 2013

Technique Tuesday - Layer, upon Layer, upon Layer

Hi Everyone
Sue Here


This month myself and Nat are showing you different craft basics and how versatile they can be! This week we are focusing on Ranger Tags in various sizes! These tags come in a selection of Manilla, Kraft & Black in 3 different sizes, today I am using one of those, the #10 in Manilla.

Today we are into LaYeRiNg.


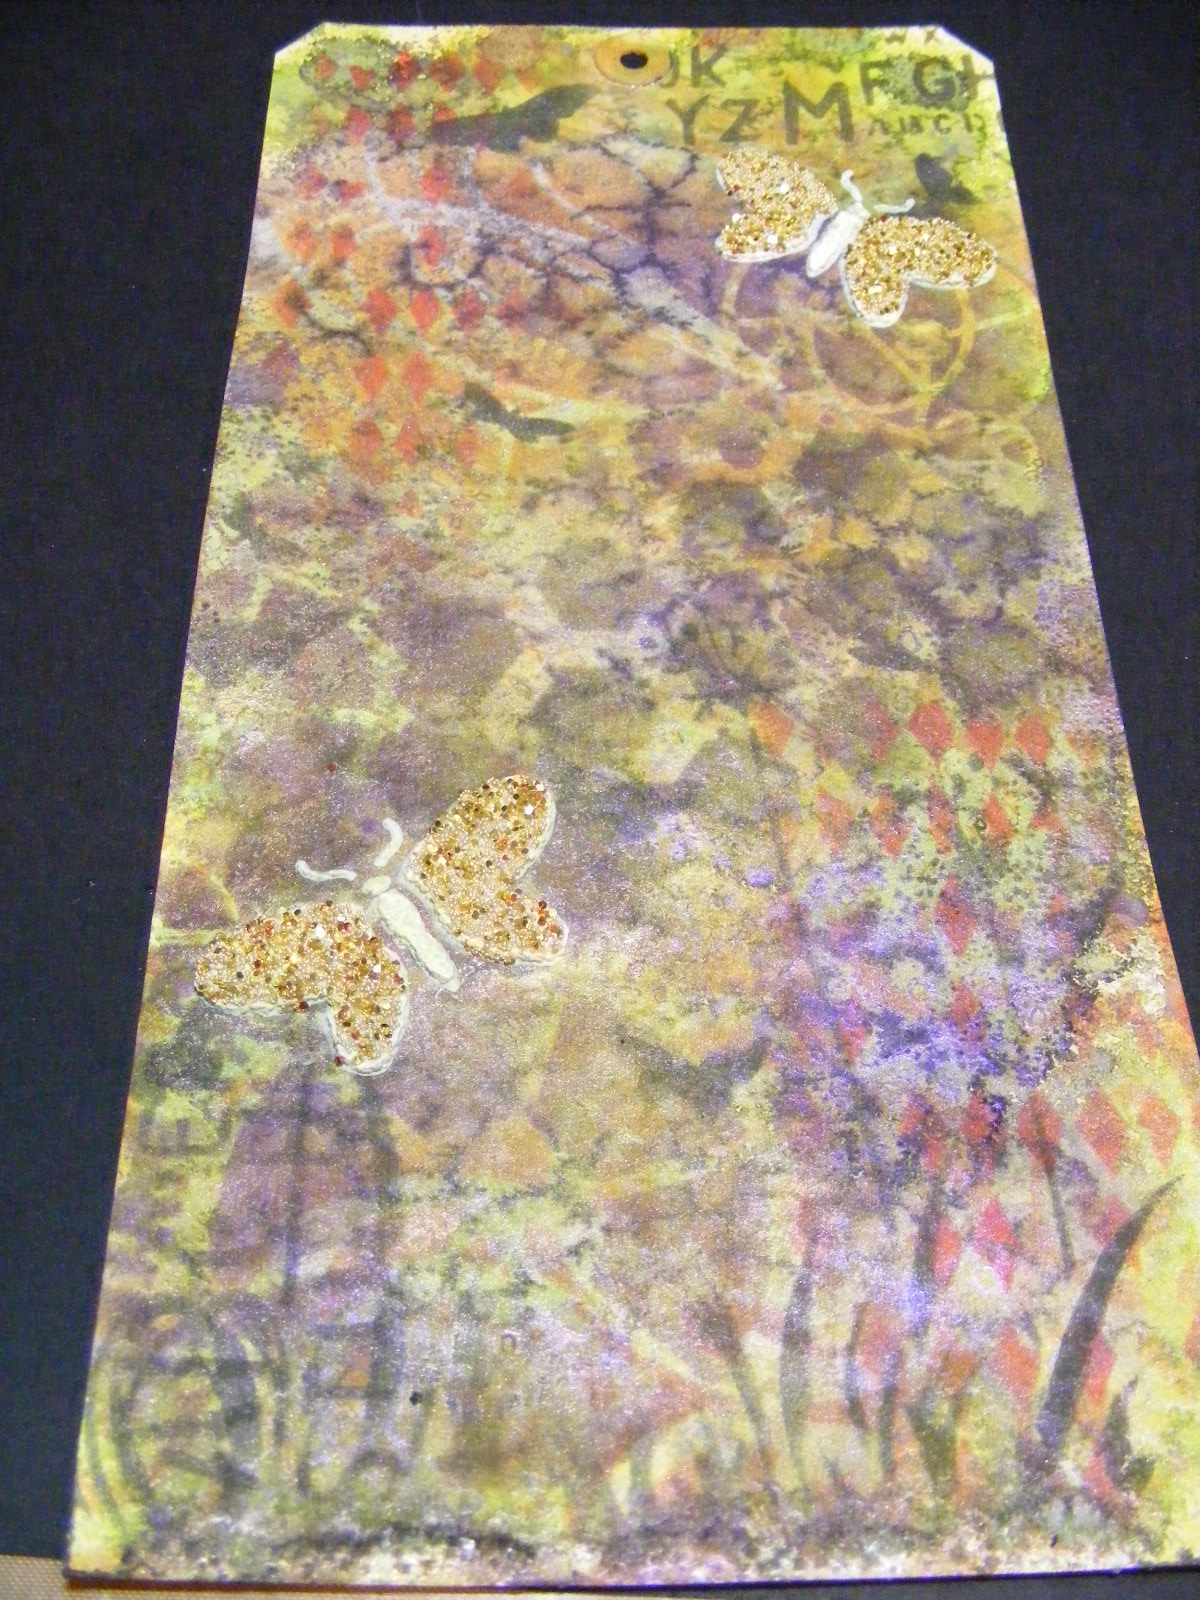
I firstly sprayed a large tag from J & C Creations with Cosmic Shimmer Sprays, then sprinkled rock salt over the top adding a squirt of water.  This effect is fantastic the more time you leave it to dry, preferably overnight.
 
layer one
 When it is dry brush off the rock salt but keep this in a bag it as it has soaked up the colour of the mica spray and you can use it in shaker cards!


layer two

layer three


Then using my masks, one layer at a time, I used memento inks and coloured in parts of the tag.


layer four
 
I then used one of the masks of a butterfly and my modeling paste from a few posts ago and put 2 butterflies on the tag.  When nearly dry I sprinkled Beadazzles onto them (this is half glitter and half very small beads).

layer six
I then stamped in Versamark the 'wind caressed' stamp a the bottom of the tag and heat dried with WOW Satin Pearl Embossing Powder.  I coloured the flowers in with a distress marker.
layer five

I then cut out one of the spellbinder butterflies 'wonderful wings' in brown cardstock, glued this to the tag, then used Versamark on the 'butterfly edge' stamp and heat with WOW Honey embossing powder.  I added a ribbon to the top of the tag.


The finished article

Have a wonderful week ...Sue

Tuesday, 22 January 2013

Experimenting makes me Hungry!!

Hi Everyone
Sue Here
spices
courtesy of nkzs
 Today's technique does not come with a completed card but I hope you'll like the experimenting you can do with products you have in your kitchen.

This technique comes courtesy of Hero Arts which is a favourite site of mine and I loved the concept, so I thought I would share it with you.

 http://www.youtube.com/watch?v=dDvIW9K9vhk&feature=player_embedded#t=47s


Firstly have a good rummage through your cupboards and get out all your powder foods such as angel delight, ground pepper, coco, powdered drinks etc.  The more fruity the better.  I hadn't got any so tottered off to the local supermarket and purchased a few!!  They cost approx 20p - 50p per packet and can be reused.
You also need clear embossing powder, a heat gun, versamark, coloured pens, a clean and empty small container and a small circle punch or spellbinder.

Firstly colour a cut out small circle with the colour of your packet of food.  e.g. blackcurrant dessert=purple coloured circle.  Take the empty container and put into this 2 scoops of clear embossing powder.  I have measuring spoons and used the smallest one.  Then in the same container put 1 scoop of the food powder, giving it a good mix.  Then press the punched out circle into the versamark then cover with the mixture.  Heat set.  Leave for 10 seconds to cool off then smell the circle and scratch it.  It will smell of the food you have put in the embossing powder! Sugar free with aspartame apparently are better at binding, but give anything a go and find out what works and what doesn't.

The powder left in the container I emptied into a small plastic resealable bag, marking it with what I had used and brushed the container ready for the next experiment.


 Not so smelly!


Good smell!


I have purchased store's own black pepper, weight watchers packet custard and jellies and Cadbury's highlights. 


This is really good if you have some cookie stamps, cake stamps or fruit stamps.  You can do a 'scratch and sniff' card!  Hero Arts recommend you use were possible sugar free stuff.  I say have a go at anything you can lay your hands on!  I must admit some of the powders I used do not give off a smell, others are fantastic.  The best one I purchased was the blackcurrant dessert - just like blackcurrants........

Happy scratching and sniffing!!
Sue

Tuesday, 15 January 2013

Love is patient, Love is kind


Hi Everyone
Sue Here

This week is the turn of Heartfelt Creations.  I love these stamps for their versatility and thick rubber which means you can do anything with them.

I have made a card using masks today.  Again these are so versatile.  The other items I have used are  Spellbinders Classic Scallop Large Circle and Heartfelt Creations Bella Rose Dies.  Stamps of Agape Love precut Set, Bella Rose Leaves precut Set.

I have also given you a link to  http://www.youtube.com/watch?v=UUdoC9FBtIE  which shows you how to use the Heartelt Creations dies with the stamps.

Firstly I used a template to cut out the card then used the same template to cut the panels in a different cardstock.

I then took the heart template and used my memento ink in love letter and distress ink in walnut stain and used cut and dry to sponge the ink through the hearts. (picture on left) I also use a little squirt of Crafters Companion repositionable spray on the back so the mask doesn't move whilst I'm
 using it.  I then used the template and put some modelling paste through it making sure I had a bowl of warm water on standby to soak it off after using it.  The modelling paste I purchased from Lidl for £2.45 for a big tub.  Great Value!  This I left overnight. (picture on right).


I then stamped the saying out onto heat resistance transparency and heat embossed with WOW ebony embossing powder.  I then cut it out with the spellbinder scallop circle and attached behind the bella rose die.


I then die cut small roses from the Desire range from Crafters Companion and pushed the petals back and inked it up with the memento love letter ink and walnut stain distress ink adding a little pearl in the middle.

Happy Crafting
Sue x

Tuesday, 18 December 2012

Technique Tuesday - Tree-mendous decs!

Hi Everyone
Sue Here

This week I am making table decorations.

The first is a tree made with cardstock Mbossibilities, Garden delights folder, paint or inks, piece of wire or lolly stick, ribbons, PVA glue and embellishments, and something to stand the tree into.

Firstly take at least 2 pieces of A6 cardstock and run them through the embossing folder.  Cut the cardstock into 2cm strips - longways.


Take the thick wire or lolly stick and glue alternate back then front, the strips under/over the wire and overlap them as your doing it.


When you feel your tree is big enough for your project, you MUST leave this to dry overnight.


You then take a ruler and mark/measure equidistant from each side of the wire 2 cms or if you want a more chunky tree make the bottom longer.  Then draw a pencil line from the bottom of the tree to the top where the wire is making a triangle.  Draw a line then cut the line on each side.  You now have it looking like a tree.

The left over bits, cut into triangles and you can use these on cards.


Paint and decorate your tree.  I chose gold cosmic shimmer paint then added some fluffy red ribbon and a string of beads.  Go to town and put on what you like.

I placed the tree into some tissue paper in the painted plant pot (from hobbycraft) and covered with artificial moss (used for artificial flowers).


Great for a decoration or table piece. Sue      

Tuesday, 11 December 2012

Technique Tuesday - Paper snowflake

Hi Everyone
Sue Here

Today we are making paper snowflakes.  I came across these on a really good website 


and this is the small template I used.

http://www.jessicajonesdesign.com/downloads/star_template_sm.pdf

I have made one with a J & C twist, using copy paper.


1. Download the large snowflake template or small snowflake template. Print enough pages so you'll have 6 squares (1 or 2 sheets, depending on which template you chose). Cut along the inner lines with an X-acto knife and then cut out the squares.

2. For each snowflake, bend the tips of the inner-most flaps toward each other and curl with your fingers to give them shape. (No tape needed for this pair of flaps.)

3. Moving outward from the center, bend the next pair of flaps around in the opposite direction until they meet. Overlap ends and secure with double-stick tape.

4. Repeat with the next pair of flaps, bending them in the opposite direction. Do the same for each concentric pair of flaps, alternating directions each time and taping ends together. Continue on to the remaining 5 squares, making the snowflake parts the same way you did the first one.

5. Tape all 6 points together to form a snowflake.


To make the J & C Creations one I firstly printed out the template then on the reverse I sprayed cosmic shimmer blue an silver colours on the paper and left it to dry.

Then on the template side coloured it in with  gathered twigs distress ink.


I then turned it back over and stamped the heartfelt Creations Rye Grass stamp in versamark and used WOW ebony embossing powder and heat set.


Then using the template cut out the squares and lines and fold as instructed. 

After gluing all six together I got my snowflake. FAB.....


Thanks to Jessica Jones for sharing her great snowflake.  Take care, Sue