Craftsuprint - The Worlds Largest Legal Craft Download Site!
Showing posts with label Dry Embossing. Show all posts

Sunday, 5 May 2013

Cogs, Springs and Love

Hi Everyone
Sue Here


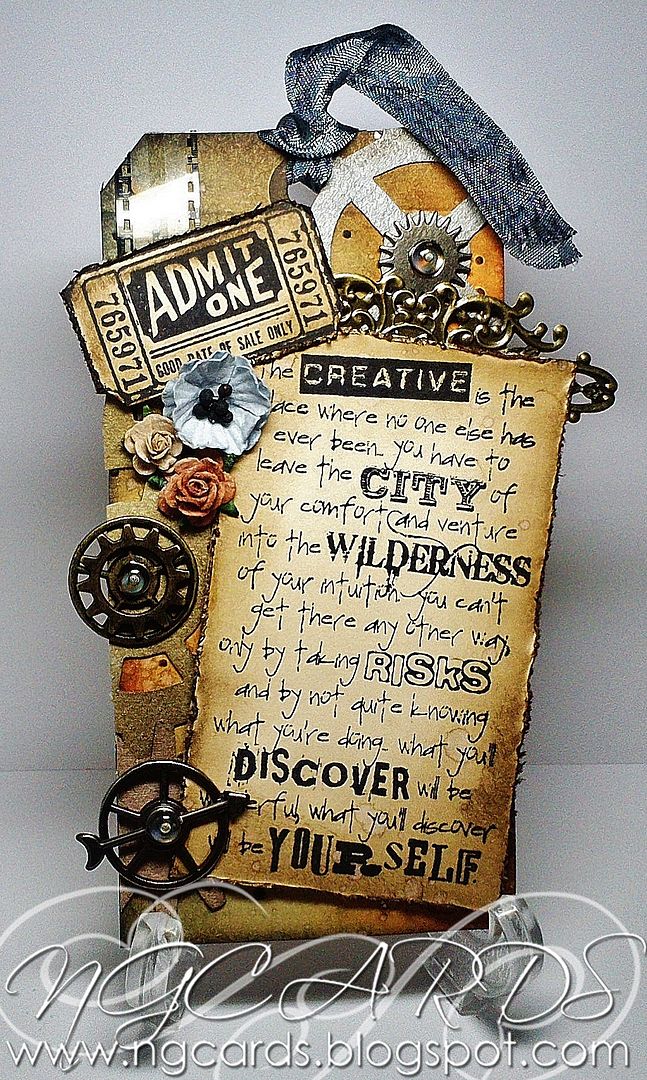
Today I have used the sticky back craft metal and run it through a Tim Holtz cog's embossing folder.  I have then added some black acrylic paint over the top then quickly took this off in different places to give a 'pitted look.'  I have then die cut some Sizzix Tim Holtz cogs in the same craft metal and again used acrylic paint to faux antique them.  I then glued some metal flower charms onto some of the background cogs.

Take a piece of white cardstock and stamp a background alphabet/script onto it.  Tear top and bottom edges and use on main script and edges  London Fog memento ink .


Take a piece of script ribbon from the Vintage ribbons and glue to the cardstock.  Over this add a piece of wire (I used a strip from chicken wire).
 
Next stamp out on the craft metal a strip of pens (These are Tim Holtz) Use an embossing tool to draw around the pens then turn the metal over and with a bigger ball tool  push the images out.  So this will not dent use some filler purchased from B & Q and fill the pushed out area a the back this raises the pens out at the front.  Once dried stick all embellishments to the front of the card.    


Finish off with a saying or word.  I chose LOVE from my stash.

 Hope these metal magic projects have given you some inspiration this week.  Take care....Sue

Thursday, 11 April 2013

Windows and Wise Words

Hi Everyone
Sue Here

LOGIC WILL GET YOU FROM A TO Z IMAGINATION WILL GET YOU EVERY WHERE!
This week is 'Wise Words' and I've started off by using a Ranger Tag and art phrases from Creative Expressions.


I firstly used Distress Stains in peeled paint and evergreen bough and blobbed this all over the tag.  I then used  an embossing folder to make the indentations on the tag.  I then used black soot distress ink around the edge of the tag and to highlight the embossed area.


I then cut out the marianne craftables CR1204 oval frame and flowers cutting these out in different brown cardstock.


The background paper has been stamped on with the penny black brick wall and the flower made with the spellbinder bitsy flowers.  I then placed these behind an acetate bubble shaker pouches.  The leaves are a marianne die, and the die at the top is from the spellbinder Moroccan accents.  The words were stamped with versamark and I used WOW ebony embossing powder over the top and heat set.  The pearl brads are from J & C Creations.

Take care ....Sue


Full Tag


Friday, 22 February 2013

Lovin' Art

Hi Everyone
Sue Here

Today I'm going to show you a scrap canvas.  I love doing these, both as commissions and for family and friends.  They are sooo personal and can look fantastic on a wall or shelf as a 3d photo instead of a picture in a frame.  If you start off with the photo, then either work with the colours in the photo, favouriate colours of the receiver of the gift or if the photo is of a trip to a foreign place, say America, use the colours of the flag, adding favoriate embellishments, sayings, and all types of mixed media.  You'll be surprised what goes together.  Have fun.

My theme was L.O.V.E.  As you can see the photo does not have to be large.  Look out for offers on canvases or watercolour canvases in places like Hobbycraft, The Range, Home Bargins or the Pound Shop.  There are offers and sales on all the time and I tend to keep a few in stock and only buy them when they are.  Also look out at car boot sales (If you've not already gathered, I'm a sucker for them)as again you can pick up unwanted canvases and paints at low prices.


Here's how I achieved my look:
Materials used:
  1. Start off with the canvas.  Take tattered rose distress ink and put some on a craft mat and dilute with water.  With a brush put it around the edges of the canvas and pull into the middle of the canvas, leaving white areas.  Do the same with Victorian velvet which makes the background into a wash with a light tinge of pink/red. Lightly heat dry. You could achieve the same look with diluted water colour paints or acrylic paints
  2. Sponge some 'london fog' through the mask with holes in leaving dots in strategic places on your canvas.  Do not be particular about this, just let your creativity flow.  You can always add more later.Dry off with heat or leave to air dry.  Take an antistatic bag and brush lightly over the canvas.
  3.  I used the antistatic bag because I didn't want the embossing powder sticking to the distress ink washed background
  4. With the love heart mask, sponge clear embossing ink through some of the mask in the top right hand corner. Sprinkle pastel pink embossing powder over the hearts and heat set.
  5. Take the scalloped edge die and halve the circle once cut out.  Use over the wrought ironwork die on the right and under the lace on the left.
  6.  Print off the saying on white vellum and pour clear embossing powder over the words to raise them.. Heat set.
  7. Place a piece of ribbon down the right hand side of the canvas.  On this I placed a flower made up of 9 hearts from the gratitude set.  I used pomegranate embossing powder.
  8. I then placed 4 pieces of thin lace around the canvas.  I love using cosmic shimmer glue as it is very strong and will dry clear.
  9. On top of the lace I places two iron book binder posts one on each side.  Again I covered these in pomegranate embossing powder.
  10. I then embossed the call me words frame onto pink vellum with London fog ink and clear embossing powder, then cut it out.
  11. The two leave scrolls are from a memory box die in different coloured vellum.
  12. The love hearts are Marianne designs and here I have sprinkled different red and pink embossing powders on them to get the effects.
  13. The 'with love' ticket is from the gratitude set, then the 'with love' stamp is from the 'with love' set and is stamped separate onto card using sherbert embossing powder then cut to fit over the front of the ticket masking out the original word 'gratitude'.  I then coloured with distress ink and distressed it slightly with black distress ink.
  14. The lock is spellbinders and I lightly went over this in 'london fog'
  15. The frame around the couple and the buttons are pure white card made from spellbinders dies. 

Wednesday, 9 January 2013

12 Tags of 2013 ... January!

Good Morning!
As promised I am back today with my version of this month's tag for 12 Tags of 2013! This was great fun last year and I am so glad that Tim Holtz decided to carry on with it again this year! Incase you are un-familiar with this all you have to do is create your own version of a tag that Tim has created each month. If you submit your entry you could be picked as one of the 12 winners each month chosen specially by Tim for a prize! Luckily enough last month I was one of these winners! Your version of the tag doesn't have to be exactly the same as his, adding your own personal twist on it works great!
So without further ado here is this month's tag ...


If you click the picture or the link above you will find a very detailed step - by - step of how to create this month's tag by Tim which is extremely helpful.
I myself have improvised on my version as I didn't have the embossing folder used for the background, the stamps or clip. However I have to say I do love the finished result!

I thought I would share a photo of how the tag looks after decorating the background. I chose to use the Cuttlebug 'Snow Dots' embossing folder for the background then the same inks Tim used along with the 'Spritz Technique' which is basically where you spritz some water from a bottle onto the tag. Make sure you do this gently however as you want water droplets instead of a mist to land.


As mentioned earlier you can find a step - by- step for the tag over on Tim's blog.


INGREDIENTS -
Tim Holtz Stamp Sets - 'Urban Tapestry' & 'Curious Possibilities' 
Tim Holtz Sizzix Alterations Die - Gadget Gears
Tim Holtz Ideo-ology - Sprocket Gears & Game Spinners
Tim Holtz Film-Strip Ribbon & Tim Holtz Paper Distresser
Ranger Glossy Accents
Seam Binding Ribbon, Metal Flourish Embellishment & Dew Drops


INKS USED -
Archival Ink - Jet Black
Distress Ink - Walnut Stain, Rusty Hinge & Stormy Sky
Distress Stains - Weathered Wood, Antiqued Bronze, Brushed Pewter & Tarnished Brass

Thanks for popping by, I do hope you will give this month's tag a try!
HAPPY CRAFTING!
NATALIE

Wednesday, 28 November 2012

A Couple of Crackers

Well November is nearly over and Christmas is creeping up fast, so for my Spellbinders project this week I have created a couple of crackers to share with you.

crack1


The Cracker Blanks are from Which Craft and are so handy for those quick last minute gifts, these would make a fantastic box for those small presents we love to receive, like DIAMOND RINGS ETC Smile.


crack6

This was one was so easy to make, I started by cutting Gold Mirra Card to fit each each side of the Cracker, I then run 3 of the Gold Oblongs through the Grand Calibur in Spellbinders M-Bossibilities Splendid Folder, leaving one without embossing to add the decoration to.


crack2

I added two Swirls covered with Stardust Stickles to the front panel then cut and embossed the 3 smallest flowers from the Spellbinders Layered Poinsettia Die from Red Card shaped the petals with my fingers and added Fran-tage Gold Crushed Glitter Glass  to the centre. The cracker was finished off by adding Red Ribbon around the top edge and for pulling the two end together and tying a bow.

crack3


The Basic Red and White Cracker was Matted with a Light colour Backing Paper, I then cut one white Motif and One lace Border from  Spellbinders Moroccan Accents, and one red Motif from Vintage Lace Motif.  Layer the White motif on top of the Red one, then concertina fold the Lace Border  and glue the edges to form a circle with Art Institute Dries Clear Glitter Glue, bring the folds together in the middle and add on top of the other motifs, I have used a very large gem to cover the workings, but you can punch a small circle and add a greeting instead.

crack4 

This side view gives you an idea of how 3d this turns out.  Finish off your Cracker as for the Gold one above.

crack5

Hope you enjoyed this quick and easy packaging idea and will try it yourself.
All the following products are available from J & C Creations  website.

Jacs xx

Tuesday, 20 November 2012

Technique Tuesday - A bit of Cling!

Hi Everyone
Sue Here


This week we are looking at motifs and accents and I have chosen Moroccan style.

Firstly the background.  On my craft sheet I placed some black soot distress ink and put water with this.  I then got a paintbrush and painted this onto a piece of 6 x 6 ins cardstock quite damp.  I then got a piece of clingfilm and scrunched this onto to the top of the wet ink.  The secret to this is to leave it to dry, then pull the clingfilm off and you should be left with some really good veins and crack effects on the paper.  I then went around the edge of the card and distressed it with the edge of a pair of scissors and inked with tumbled glass and faded jeans distress ink.

Next I used the Heartfelt Creations Tattered Collage stamp and inked up in memento London Fog ONLY the writing on it and stamped a background.  I then took the Penny Black wood mounted flying stars and stamped this out on the left and right in black memento ink.


I then inked around the edges of a smaller piece of white cardstock the faded jeans and tumbled glass ad stamped in black memento the Penny Black first day of Christmas wood backed stamp. 


I then got the Whimsy embossing folder and touched this up in places with antique linen distress ink then ran my stamped image through it.  I then distressed the edges of the card with my scissors as before.


I then die cut the border from the Moroccan motifs out of the spare embossed piece which was left and inked up with the same colours as before.

I then die cut the label from the motifs and coloured in with the same colours and added a sentiment.

I glued all this together with Cosmic Shimmer Acrylic glue and added a piece of lace behind the border.

Oldie worldie at its best.......... Hope you find some inspiration this week.    Sue 

Tuesday, 13 November 2012

Technique Tuesday - Expandable Craftables!

Hi Everyone

Sue Here


Today we are looking at Spellbinder Expandable Patterns. These are fab dies and have intricate patterns on them which allows you to make elongated die cuts.  I have chosen  - Botanical Swirls.  Further 'How to's' can be found at the Spellbinder website.  Just follow these links:

http://www.youtube.com/watch?v=01_ZNjWGjoo


Firstly I diecut the spellbinder wings, the expandable, the spellbinder heart, embossed an m bossabilities on white cardstock for the background and had a flower die for a corner piece.


I then used distress ink in peacock feathers and black soot on the embossed white card.  The expandable patters I die cut out of glossy black card.


I then diecut a spellbinder heart shape in black card which had already been embossed and added a lacy edge in black gingham.


I then cut a butterfly from the spellbinder set and inked up in versamark and used WOW nice ice blue embossing powder on the top.


I then glued it all together with Comic Shimmer Acrylic glue.

Happy crafting and if I saw you at the NEC this week hope you had a wonderful time!

Sue

Monday, 12 November 2012

Spellbinder's Expandables!

Good Morning!
This week we are showcasing the Spellbinder's Expandables and I am kick starting this off by sharing a card I made using the 'Botanical Swirls'.


To create this card I have used the negative design as a mask after running it through my cuttlebug to create a Design Paper! To do this I simply laid the design flat on some white cardstock and sprayed a combination of Distress Re-Inker & Perfect Pearls mixed together in a mister over the top. I have then created a second DP by gently misting another piece and simply leaving it to dry.


INGREDIENTS -
Spellbinder's Expandables 'Botanical Swirls'
Spellbinder's Nestabilities Classic Circles Small & Large
Penny Black Stamp '...everyday'
Flowers from WOC
White Organza Ribbon, Twinlets Glitter & Dew Drops


INKS USED -
Distress Re-Inker - Peacock Feathers & Shaded Lilac
Distress Ink - Peacock Feathers

Thanks for popping by!

HAPPY CRAFTING!
NATALIE

XXX