Hi Everyone
Sue here
I have started off this week with a really simple technique with napkins. You can apply this technique to tissue paper as well, but napkins are in every department store and garden centre and come in umpteen colours and pictures.
These napkins I purchased from the Harrogate show(5 for £1) and are 3 ply (which means 3 layers). On your projects you only need the first layer with all the colour and pictures on. However if you are cutting items out, only separate the layers once you have cut the pattern out as the paper is very delicate and will tear.
I started with the napkin and tag and you usually find that the pattern is repeated 4 times at least, flowers will be all over the napkin and so you will get at least 4 cards or projects out of 1 napkin.
Take your backing card (whatever colour you like, I chose white) and put PVA or bookbinding glue over this piece of card. Separate the layers and place the 1st layer of the napkin over the glue and gently press down. The napkin should be slightly bigger than the cardstock underneath and if you find that it isn't, you can add another layer over the top.
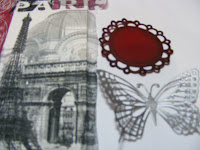
This was the case with the words PARIS, the napkin did not reach up to the top of the tag so I glued the word at the top of the tag. It doesn't matter if you find a few crinkles in it as this adds to the effect. Leave to one side to dry. If you are cutting out flowers follow these instructions and once glued onto card, leave to dry then cut them out. You can decoupage them quite successfully.
You can add layer upon layer for different effects as the paper is slightly transparent and use your crackle accents for further effects.
Once dry, sand around the end of the card and the napkin surplus will come off. I then went around the edge with black soot distress ink.
If you sand the napkin and add distress inks on top you can make it a really distressed project.

I then die cut spellbinder picot edge circle in burgundy card matching the napkin background followed by a marianne creatable butterfly LRO115 in silver card.

I then inked these up with black soot distress ink and glued both onto the front of the tag with cosmic shimmer acrylic glue.
Simple Elegance
Sue


Thank you for the tips about the napkins! :)
ReplyDeleteThis is so elegant - how amazing that it began with a simple paper napkin! Thanks for the instructions!
ReplyDeletelove Mags B x